Photo

The Ghola asset management program

I am now using Kavasoft Shoebox and thus this whole entry is obsolete and kept only for historical purposes. It is interesting to see one of my requirements anticipated Aperture’s stacks.

Introduction

I am in the process of migrating from Windows to Mac OS X as my primary home computing environment. IMatch is one of the key applications I need to migrate, but it is not available on the Mac. Ghola is an attempt to reproduce the key functionality of IMatch, and possibly go beyond. It is also a good way to learn Cocoa programming (my last programming experience on the Mac goes back to Think C 4.0 accessing raw QuickDraw calls).

Use cases

  1. Assign categories to images or a folder of images.
  2. Search for images matchin an expression of categories.
  3. Restructure a category (e.g. splitting a category grown too large into multiple, more manageable subcategories).

Requirements (incomplete)

The following are the key features from IMatch that need to be carried over:

  • The flexible set-oriented category system.

  • Support for RAW images (CRW and NEF).

  • Fast retrieval performance.

  • Extensible metadata.

  • Offline media support.

The following are the requirements for Ghola beyond IMatch:

  • Ability to group very similar variants of an image together. This would allow to group an image original, retouched versions, cropped and resized versions, or multiple very similar images taken in succession, yet manage them as a single logical unit. The role of each image in the group would be identified as well as part of its group membership, and each group would have a leader used by default.

  • Manage assets beyond images, such as PDF files.

  • Highly efficient categorization user interface.

  • Scriptable in Python.

  • HTML gallery generation, integrated with Mylos.

Implementation directions

The system core will be implemented in Python, and C if necessary. It should be as portable as possible. Possibly even multi-user and remotable.

SQLite will be used as the core database. Fast, simple, easy to manage.

GUI front-ends will use the native toolkits (PyObjC) whenever possible for optimal user experience and Aqua compliance.

A command-line UI could be more efficient for category assignment, if it is augmented with features like completion.

We may have to use bitmap indexes for efficient category indexing. Boolean operations on Python long integers are surprisingly fast, and C might not be needed at this point.

Colophon

The System name is a reference to Frank Herbert’s Dune (the original series, of course, not the opportunistic add-ons by Brian Herbert. It has the nice side benefit of not being already used by another open-source program.
Archival photography

Henry Wilhelm is a well-known authority on preserving photographs. He pretty much wrote the book on the subject, and it is now downloadable for free in PDF format from his website.

In a nutshell:

  • No widespread color process is really archival, unlike black & white
  • Fuji good, Kodak bad

Wilhelm has contributed greatly to making photographs last by raising the public’s awareness of conservation issues, at a time when manufacturers like Kodak were engaging in deliberately deceptive marketing implying that color prints would “last forever”, when they knew the prints would not exceed 10 to 15 years (Fuji has put far more effort in making their materials last).

That said, his simulated aging testing methodology has been criticized as too optimistic, and in one embarrassing instance, Epson Stylus Photo 2000 inkjet photo papers he highly rated for their durability turned out to be very short-lived because they were very sensitive to very common ozone pollution. For an alternative, more conservative, take on inkjet print longevity, Stephen Livick’s website offers a valuable counterpoint.

My take on the subject: I almost exclusively use black & white film because it has a distinct character and is archival without special equipment or active attention. Color film relies on dyes (that fade over time) rather than silver, and fades quickly or suffers from weird color shifts even when kept in the dark. The exception is Kodachrome, which keeps a very long time in the dark despite being also dye-based, but Kodak is not enthusiastic in supporting it and its future availability is uncertain. Given that, it makes more sense to use digital, which has more than caught up in quality, and at least has the potential for lasting images if managed properly (a big if: imagine you were to disappear tomorrow, would your heirs know how to retrieve your digital photos from your computer?).

And of course, I boycott Kodak, a company ruled by bean-counting MBAs whose only concern seems to be how to cut corners in silver content at the expense of product quality, much like Detroit automakers behaved before American consumers wised up to the shoddy quality of their products. Then again, Kodak’s current management is stacked with former HP executives who are turning the company into a HP-wannabe, thus predictably accelerating its slide into irrelevance.

Costco San Francisco switches to Noritsu

I visited the San Francisco Costco yesterday, and they have replaced their Fuji Frontier 370 mentioned here with a Noritsu QSS-3101 (PDF). This generation of Noritsu digital minilab uses a laser rather than the MLVA (LED) technology used in earlier Noritsu minilabs, and it should have equivalent quality (I will know for sure this coming Thursday when I get my prints back – it seems the word is out and Costco now has quite a backlog).

The nice thing is they now have a self-service Noritsu CT-1 kiosk where you can upload your photos from flash cards or CD, albeit with a slightly clunky interface. They also support 8×12 rather than 8×10 now, and more interestingly larger sizes such as 11×14 ($2.99), up to 12×18 (also $2.99 apiece).

Fortunately, the paper used is still Fuji Crystal Archive rather than the inferior Kodak alternatives Noritsu is usually associated with (Kodak resells Noritsu minilabs, and allegedly some Agfa minilab components as well).

Update (2003-07-30):

I picked up the prints this evening. Unfortunately, contrary to what the guy at the counter said, they did crop the photos instead of adding white margins. The end result? Many prints with partially decapitated people, and those that have been spared are too wide to fit in my 8×10 album.

The prints are sharp, but significantly darker and less saturated than my proof on-screen (I calibrate my monitor with a ColorVision SpyderPRO). The Fuji Frontier was much closer to the sRGB space, it seems. I have no idea why Noritsu calibrates its machines to some completely different standard than sRGB despite the fact the latter is the industry standard. I will take a calibration target when I go to have them redone tomorrow.

I consider myself quite knowledgeable about computers and digital photography, and I can cope with manual resizing of pictures to prevent brain-dead cropping, or working with custom profiles to work around poorly calibrated printers. I am sure 99% of the digital camera buying population will be unable to go through these unnecessary hoops. They will just get dull, oddly cropped photos back and naturally think the technology is at fault, and go back to using inkjet printers even though they produce grainy prints with poor durability, all for a king’s ransom. Fuji, Kodak and the rest are already playing catch-up in the digital printing space, they will definitely lose the race if they do not improve their firmware and require digital minilab operators to calibrate their units.

Update (2003-09-24):

I gave them a lot of 25 11×14 to print on Monday. Mindful of my previous cropping fiasco, I first gave them a trial run of 6 last week (3 “lustre” and 3 glossy), as well as to test the Dry Creek Photo color management profiles. The prints came out fine, with reasonably accurate color (within the limits of the printer’s gamut). They had a half inch white border on top and bottom, as the Noritsu’s native output size is 12×14, and the lab technician told me they were expecting a trimmer next week.

Unfortunately, when I retrieved my prints yesterday (insert mandatory joke here about “someday, my prints will come”), unlike the trial run, they expanded the print to the full 12×14 paper area (thus trimming off about 1 inch on each side from the print, and ruining the composition). Costco disabled 11×14 and 12×18 prints from the CT-1 interface. They must be running the printer on manual for these print sizes because the software on the CT-1 is brain-dead about cropping, but it seems all operators are not equally well trained with the new equipment, and I suspect the user interface is confusing enough to allow them to shoot themselves (or me, in this case) in the foot.

Conclusion: color management profiles are a must for this Noritsu printer, and be very specific about cropping instructions as their workflow is inconsistent from operator to operator. And it’s a good thing they have a money-back guarantee…

Beating the inkjet racket

HP introduced a new line of printers recently, with one model starting at $40, or barely more than the ink cartridges for it that cost $21. A British consumer magazine has exposed the deceptive and price-gouging practices of inkjet printer manufacturers. No wonder most of HP’s profits come from their printing business, their computer division being a mere hanger-on, and they have adopted King Gillette’s “give away the razor, sell the blades” business model with a vengeance.

Printing photos on an inkjet paper is particularly expensive since most of the paper surface is covered in ink, unlike conventional documents where the ratio is only 5% of so. If you are a digital photographer needing to make prints, you should look beyond the low purchase price for these printers, as there are far better options available.

There are many processes to produce prints from digital originals. You can use inkjet printers, dye-sublimation printers, Fuji’s Pictrography, and digital minilabs. Color laser printers are relatively economical, but are best used for office documents rather than photos as their output is not particularly vivid. Inkjet printers have vivid colors but their results fade very quickly (apart from a handful of pigment-based ink models from Epson in their 2000/2100/2200 series). Dye sublimation printers have excellent smooth colors, and last longer thanks to their protective overcoat layer, but are usually expensive to run and have limited paper size options. Fuji’s Pictrography process is a true photographic process, but both printers and media are expensive, and it is most suitable for professional photographers who need to produce in-house proof prints for clients on a deadline, but cannot afford a $175,000 digital minilab.

This leaves what is in my opinion the best option for obtaining prints, digital minilabs. These are machines that expose conventional (silver) photo paper with lasers or LEDs. The key players are Fuji with their Frontier system, Noritsu (Kodak’s partner) and Agfa with their d-Lab. All of these systems will yield excellent, smudge-proof and durable prints, and are invariably far more cost-effective than the alternatives. You can get 4in x 6in (10cm x 15cm) prints made for as low as 20 cents each online or at many places like Costco. In many cases, you can just insert a memory card or CD in a kiosk system like the Fuji Aladdin, select your pictures, crop and adjust contrast, and they will be sent to the minilab to be printed within an hour.

Digital minilabs are usually limited to 8in x 10in or 11in x 14in prints. For larger sizes, you need to use a professional lab that uses high-end large-format machines like the Cymbolic Lightjet or Durst Lambda, which use lasers as well, but operate on large rolls of photo paper for advertising and other high-end applications. I have had a 4in x 100in panoramic print (yes, you read that right) made on a Lightjet by Pictopia.com, with excellent results. These services are usually more expensive, about $10-15 per square foot, but use higher quality professional grade paper rather than the consumer-level kind (usually thinner and not quite as durable) used by mass-market shops.

Using the Canon Magnifier S with the 10D

The Canon EOS 10D, like most modern autofocus cameras, has a viewfinder screen that leaves somewhat to be desired for fine manual focus. Manual focus is still required for special applications like macro photography or the use of Canon’s TS-E Tilt-Shift lenses.

The only way to improve the accuracy of the laser matte ground glass is to use a focusing magnifier. One is built into the Angle Finder C, but that is a very expensive accessory (not quite as princely priced as the $250 Leica Viewfinder Magnifier M 1.25x, however…).

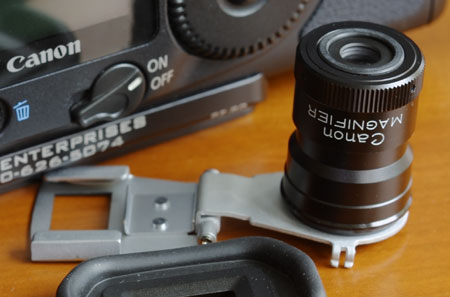
Another, cheaper option is to use the Canon Magnifier S. This accessory has been discontinued by Canon, but it can readily be found on places like eBay. I paid $56 for mine (mint “old new” stock), including shipping.

Magnifier S

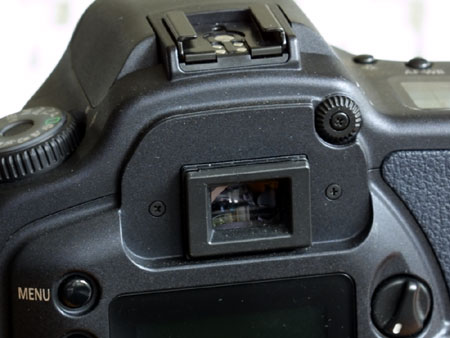
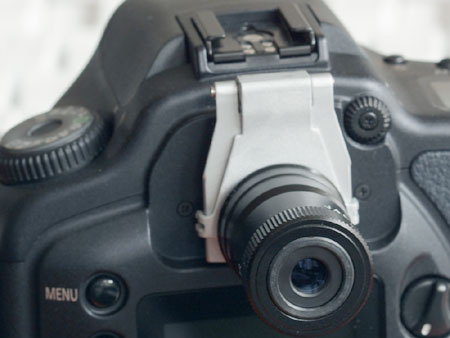
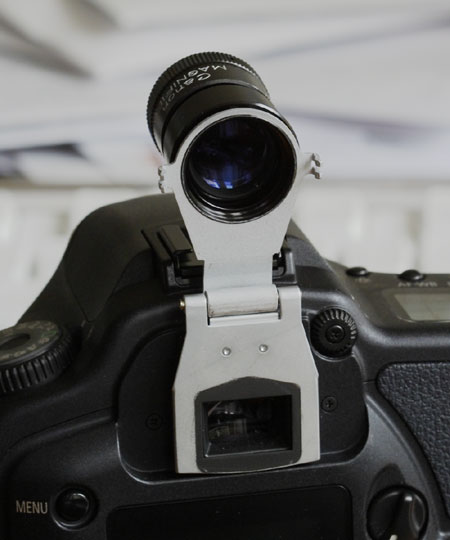
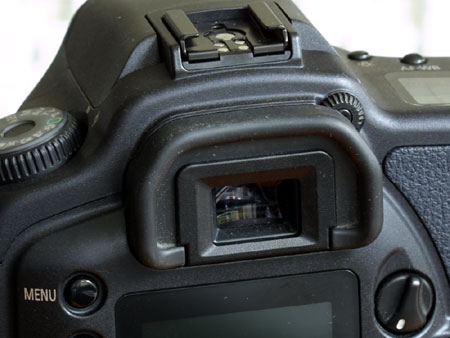
This is a focusing loupe that slides onto the 10D’s viewfinder using the supplied Adapter S as a replacement for the standard eyecup, as shown below. It magnifies the central portion of the image only by a 2.5x factor. Unfortunately, it seems Canon does not make a wide-field magnifier equivalent to the DW-4 viewfinder for the Nikon F3, which offers 6x full-field magnification!

Mounting step 1Mounting step 2 Mounting step 3

The advantage of this setup is that the magnifier can easily be flipped out of the way as needed.

Flip-up

Update (2003-09-12):

I got to handle the new Canon EOS 300D (Digital Rebel) last Wednesday, and the Magnifier S fits it as well.

Update (2005-09-04):

Yes, it also fits the Rebel XT.