TL:DR This is way, way more complicated than it needs to be
For a very long time, I ran this site off my cloud server in the US. When I
moved to London, I started experiencing the painful impact of the ~100ms
latency on the loading time for images and videos, and decided to move to a
Content Delivery Network (CDN) with global reach. Unfortunately, most CDNs
have steep minimum spend requirements that are excessive for a low-traffic
site like this one. Amazon’s CloudFront is an exception, and my hosting costs
are in the vicinity of $20 per month, which is why I settled for it despite my
dislike for Amazon.
Serving a static site is not just about putting content somewhere to be served over HTTPS. You also need to set up HTTP headers:
- Cache-Control headers to ensure static content isn’t constantly checked for
changes.
- Security Headers to enable HSTS and protect your users from abuse
like Google FLoC, sites that
iframe your content or XSS injection.
In my original nginx configuration, this is trivial if a bit verbose, just add:
expires: max;
add_header Strict-Transport-Security "max-age=31536000; includeSubDomains; preload";
add_header Content-Security-Policy "default-src 'self' https://*.majid.info/ https://*.majid.org/; object-src 'none'; frame-ancestors 'none'; form-action 'self' https://*.majid.info/; base-uri 'self'";
add_header X-Frame-Options "SAMEORIGIN" always;
add_header X-Xss-Protection "1; mode=block" always;
add_header X-Content-Type-Options "nosniff" always;
add_header Referrer-Policy no-referrer-when-downgrade;
add_header Feature-Policy "accelerometer 'none'; ambient-light-sensor 'none'; autoplay 'none'; battery 'none'; camera 'none'; display-capture 'none'; document-domain 'none'; encrypted-media 'none'; execution-while-not-rendered 'none'; execution-while-out-of-viewport 'none'; fullscreen 'none'; geolocation 'none'; gyroscope 'none'; layout-animations 'none'; legacy-image-formats 'none'; magnetometer 'none'; microphone 'none'; midi 'none'; navigation-override 'none'; oversized-images 'none'; payment 'none'; picture-in-picture 'none'; publickey-credentials-get 'none'; sync-xhr 'none'; usb 'none'; vr 'none'; wake-lock 'none'; screen-wake-lock 'none'; web-share 'none'; xr-spatial-tracking 'none'; notifications 'none'; push 'none'; speaker 'none'; vibrate 'none'; payment 'none'";
add_header Permissions-Policy "accelerometer=(), ambient-light-sensor=(), autoplay=(), battery=(), camera=(), cross-origin-isolated=(), display-capture=(), document-domain=(), encrypted-media=(), execution-while-not-rendered=(), execution-while-out-of-viewport=(), fullscreen=(), geolocation=(), gyroscope=(), magnetometer=(), microphone=(), midi=(), navigation-override=(), payment=(), picture-in-picture=(), publickey-credentials-get=(), screen-wake-lock=(), sync-xhr=(), usb=(), web-share=(), xr-spatial-tracking=(), clipboard-read=(), clipboard-write=(), gamepad=(), speaker-selection=(), conversion-measurement=(), focus-without-user-activation=(), hid=(), idle-detection=(), serial=(), sync-script=(), trust-token-redemption=(), vertical-scroll=(), notifications=(), push=(), speaker=(), vibrate=(), interest-cohort=()";
Doing this with CloudFront is much more complicated, however. You have to use
a stripped-down and specialized version of their AWS Lambda “serverless”
Function-as-a-Service framework, Lambda@Edge. This is very poorly
documented, so this is my effort at rectifying that. When I first set this up,
only Node.js and Python were available, but it seems Go, Java and Ruby were
added since. I will use Python for this discussion. The APIs are quite
different for each language so don’t assume switching languages is painless.
In the interests of conciseness, I am going to skip the parts about creating a S3 bucket and enabling it for CloudFront. There are many tutorials available online. I use rclone to deploy actual changes to S3, and make an AWS API call using awscli to trigger a cache invalidation, but software like Hugo has built-in support for AWS. Here is my deployment target in my Makefile:
deploy:
	git push
	git push github master
	-rm -rf awspublic
	env HUGO_PUBLISHDIR=awspublic hugo --noTimes
	-rm -f awsindex.db
	env HUGO_BASE_URL=https://blog.majid.info/ ./fts5index/fts5index -db awsindex.db -hugo
	rclone sync -P awspublic s3-blog:fazal-majid
	rsync -azvH awspublic/. bespin:hugo/public
	scp awsindex.db bespin:hugo/search.db
	ssh bespin svcadm restart fts5index
	aws cloudfront create-invalidation --distribution-id E************B --paths '/*'
First of all, even though Lambda@Edge runs everywhere CloudFront does, you
cannot create functions everywhere, so you will need to go to the Lambda
functions console then switch your region to US-West-1 in your AWS Console
drop-down menu (even though my CloudFront and S3 are in eu-west-2 (London).

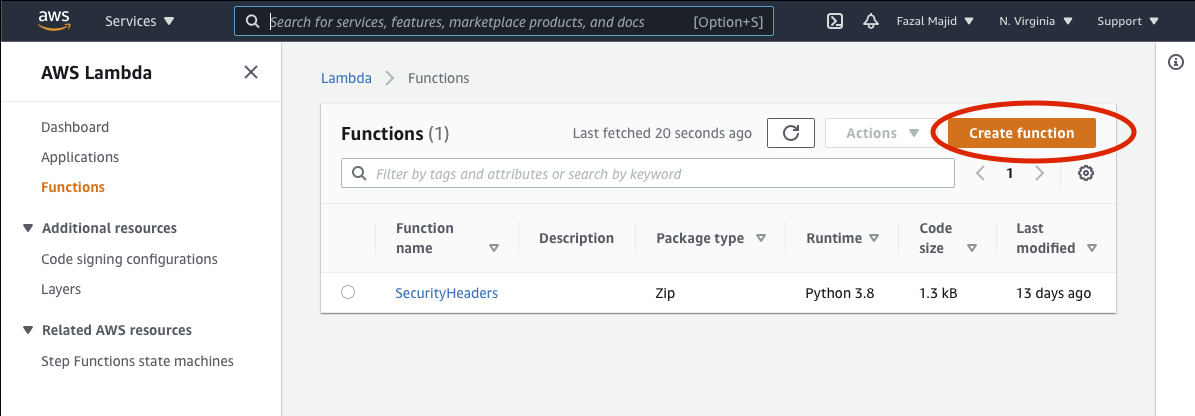
Click on the Create Function button.
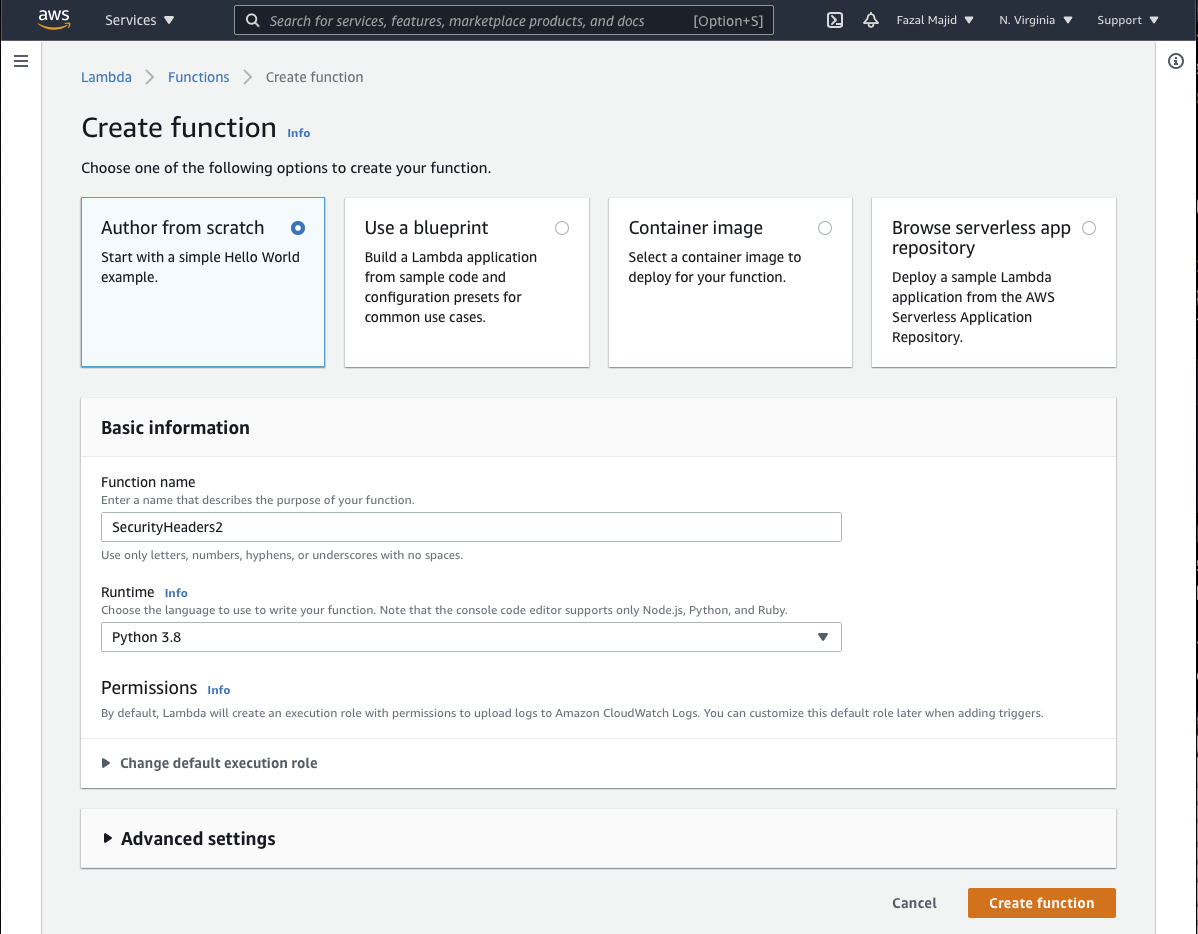
Then choose Author from scratch, give a name (in my case, SecurityHeaders) and choose the Python 3.8 runtime.
In the development environment, click on lambda_function.py to edit the code of your function.
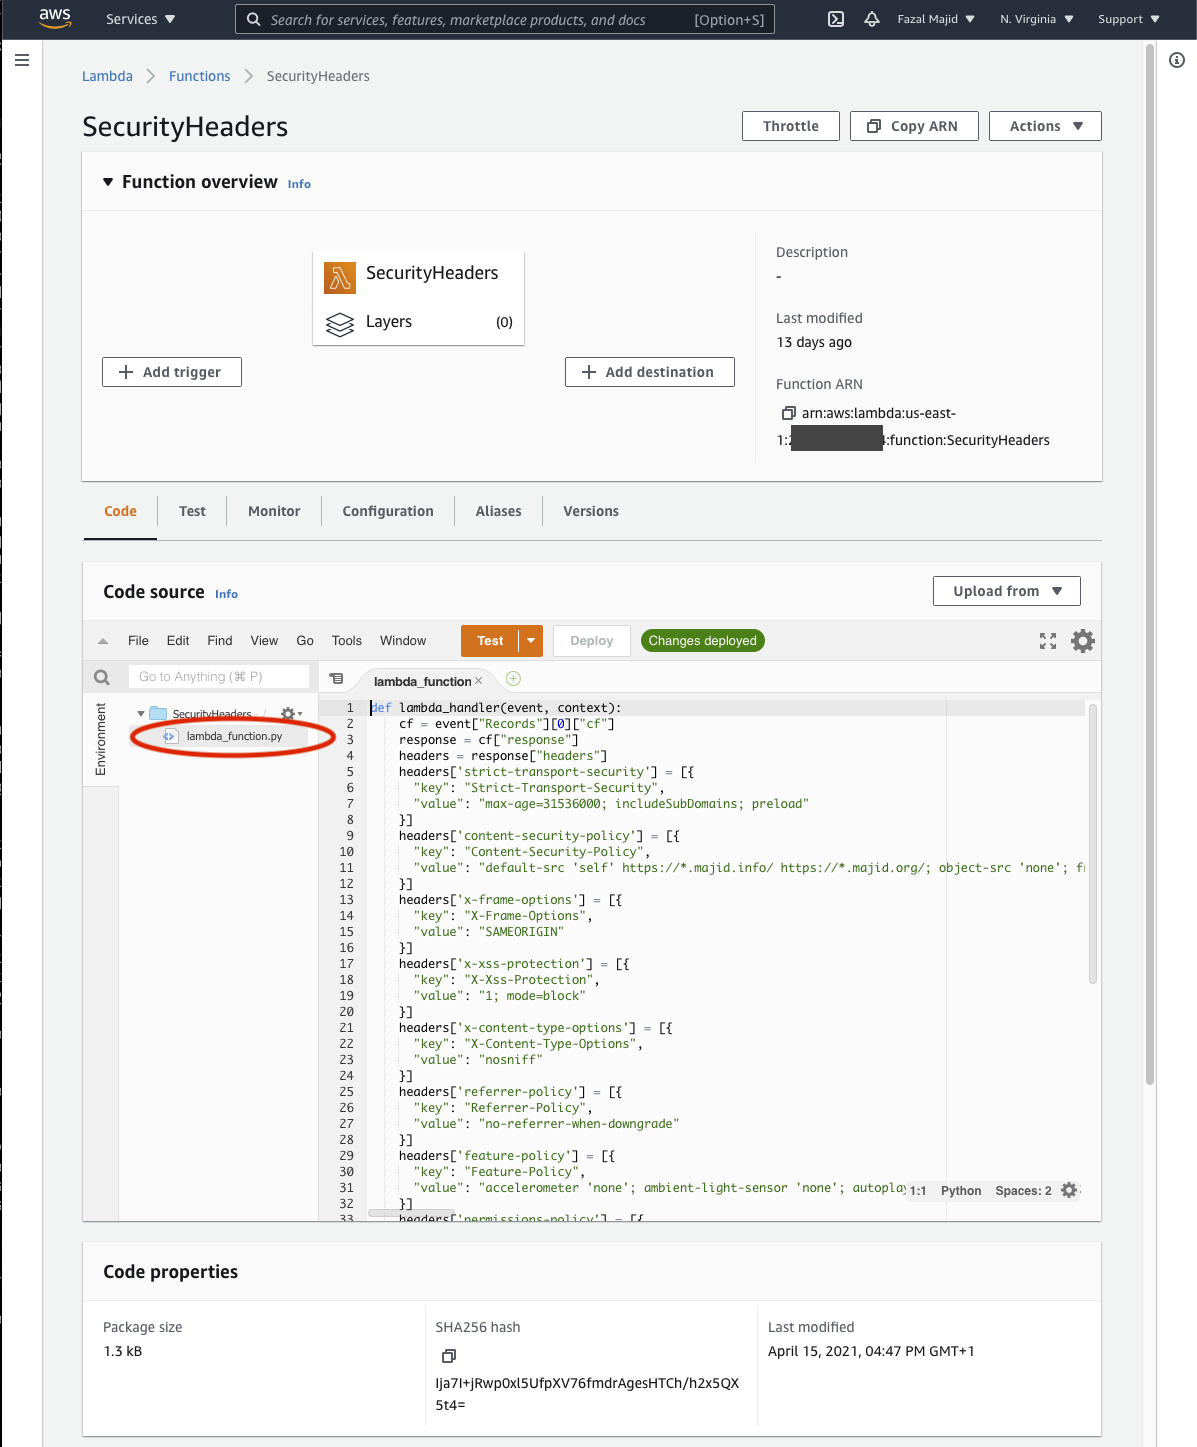
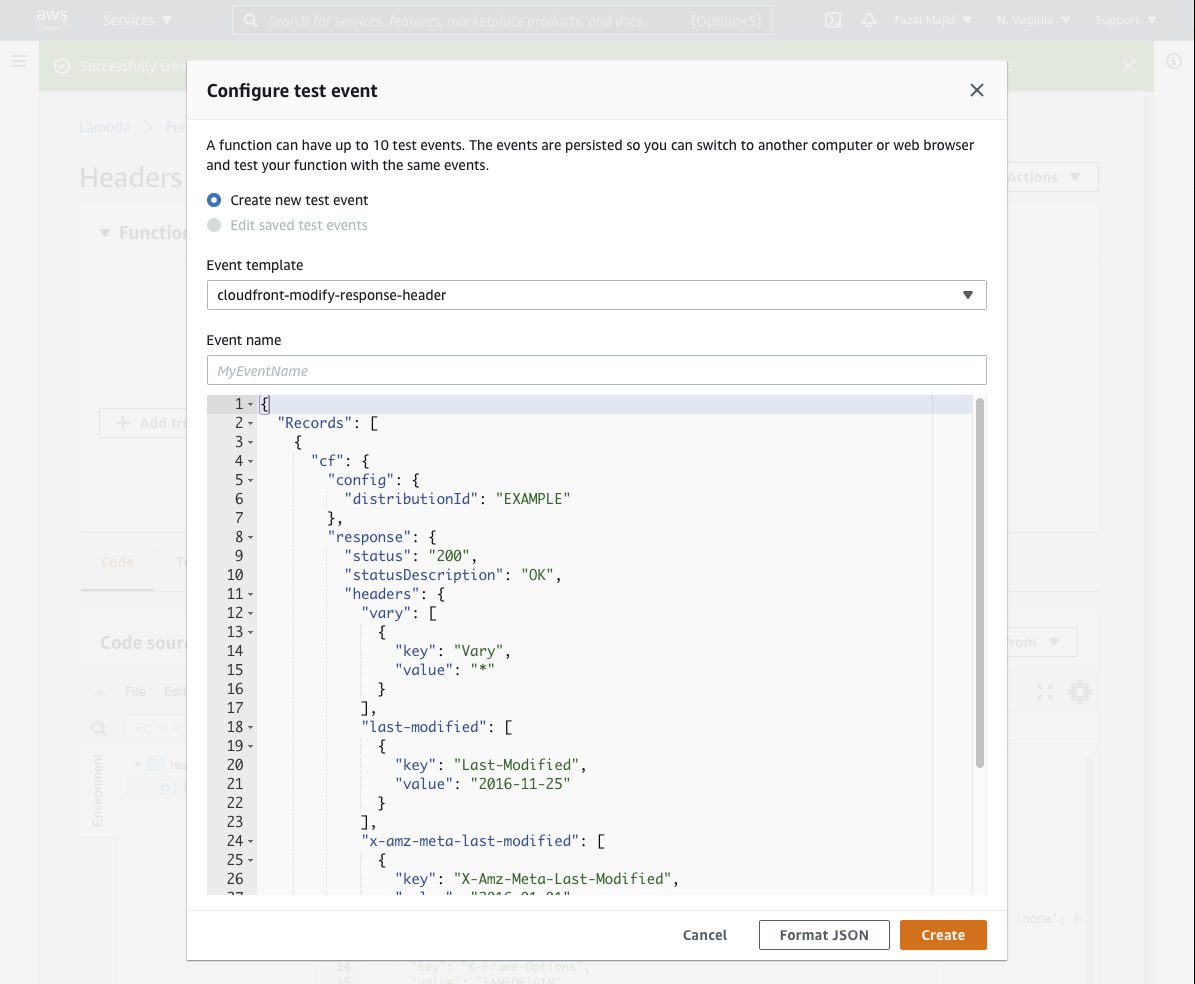
Click on Deploy (which is really more of a Save button), then press the orange Test button. Choose the Event Template cloudfront-modify-response-header. Save it, e.g. TestHeaders and click again on the Test button to verify the function executes without exceptions.
Here is the code I use:
def lambda_handler(event, context):
    cf = event["Records"][0]["cf"]
    response = cf["response"]
    headers = response["headers"]
    headers['strict-transport-security'] = [{
      "key": "Strict-Transport-Security",
      "value": "max-age=31536000; includeSubDomains; preload"
    }]
    headers['content-security-policy'] = [{
      "key": "Content-Security-Policy",
      "value": "default-src 'self' https://*.majid.info/ https://*.majid.org/; object-src 'none'; frame-ancestors 'none'; form-action 'self' https://*.majid.info/; base-uri 'self'"
    }]
    headers['x-frame-options'] = [{
      "key": "X-Frame-Options",
      "value": "SAMEORIGIN"
    }]
    headers['x-xss-protection'] = [{
      "key": "X-Xss-Protection",
      "value": "1; mode=block"
    }]
    headers['x-content-type-options'] = [{
      "key": "X-Content-Type-Options",
      "value": "nosniff"
    }]
    headers['referrer-policy'] = [{
      "key": "Referrer-Policy",
      "value": "no-referrer-when-downgrade"
    }]
    headers['feature-policy'] = [{
      "key": "Feature-Policy",
      "value": "accelerometer 'none'; ambient-light-sensor 'none'; autoplay 'none'; battery 'none'; camera 'none'; display-capture 'none'; document-domain 'none'; encrypted-media 'none'; execution-while-not-rendered 'none'; execution-while-out-of-viewport 'none'; fullscreen 'none'; geolocation 'none'; gyroscope 'none'; layout-animations 'none'; legacy-image-formats 'none'; magnetometer 'none'; microphone 'none'; midi 'none'; navigation-override 'none'; oversized-images 'none'; payment 'none'; picture-in-picture 'none'; publickey-credentials-get 'none'; sync-xhr 'none'; usb 'none'; vr 'none'; wake-lock 'none'; screen-wake-lock 'none'; web-share 'none'; xr-spatial-tracking 'none'; notifications 'none'; push 'none'; speaker 'none'; vibrate 'none'; payment 'none'"
    }]
    headers['permissions-policy'] = [{
      "key": "Permissions-Policy",
      "value": "accelerometer=(), ambient-light-sensor=(), autoplay=(), battery=(), camera=(), cross-origin-isolated=(), display-capture=(), document-domain=(), encrypted-media=(), execution-while-not-rendered=(), execution-while-out-of-viewport=(), fullscreen=(), geolocation=(), gyroscope=(), magnetometer=(), microphone=(), midi=(), navigation-override=(), payment=(), picture-in-picture=(), publickey-credentials-get=(), screen-wake-lock=(), sync-xhr=(), usb=(), web-share=(), xr-spatial-tracking=(), clipboard-read=(), clipboard-write=(), gamepad=(), speaker-selection=(), conversion-measurement=(), focus-without-user-activation=(), hid=(), idle-detection=(), serial=(), sync-script=(), trust-token-redemption=(), vertical-scroll=(), notifications=(), push=(), speaker=(), vibrate=(), interest-cohort=()"
    }]
    headers['x-fm-version'] = [{
      "key": "x-fm-version",
      "value": str(context.function_version)
    }]
    # caching
    if "request" in cf and "uri" in cf["request"]:
      url = cf["request"]["uri"]
      ext = url.split('.')[-1].lower()
      if url.endswith('/') or ext in ('html', 'gif', 'png', 'jpg', 'jpeg', 'ico', 'css', 'js', 'eot', 'woff', 'mp4', 'svg'):
        headers['expires'] = [{
          "key": "Expires",
          "value": "Thu, 31 Dec 2037 23:55:55 GMT"
        }]
        headers['cache-control'] = [{
          "key": "Cache-Control",
          "value": "max-age=315360000, immutable"
        }]

    return response
You will need to modify the hardcoded value for Content-Security-Policy, most likely you don't want your images and assets to be only served from https://*.majid.info/... Also, I cache all HTML forever in the browser, which may be more aggressive than you want if you update content more frequently than I do.
Before you can set up the hook, you will need to deploy your code to Lambda@Edge.
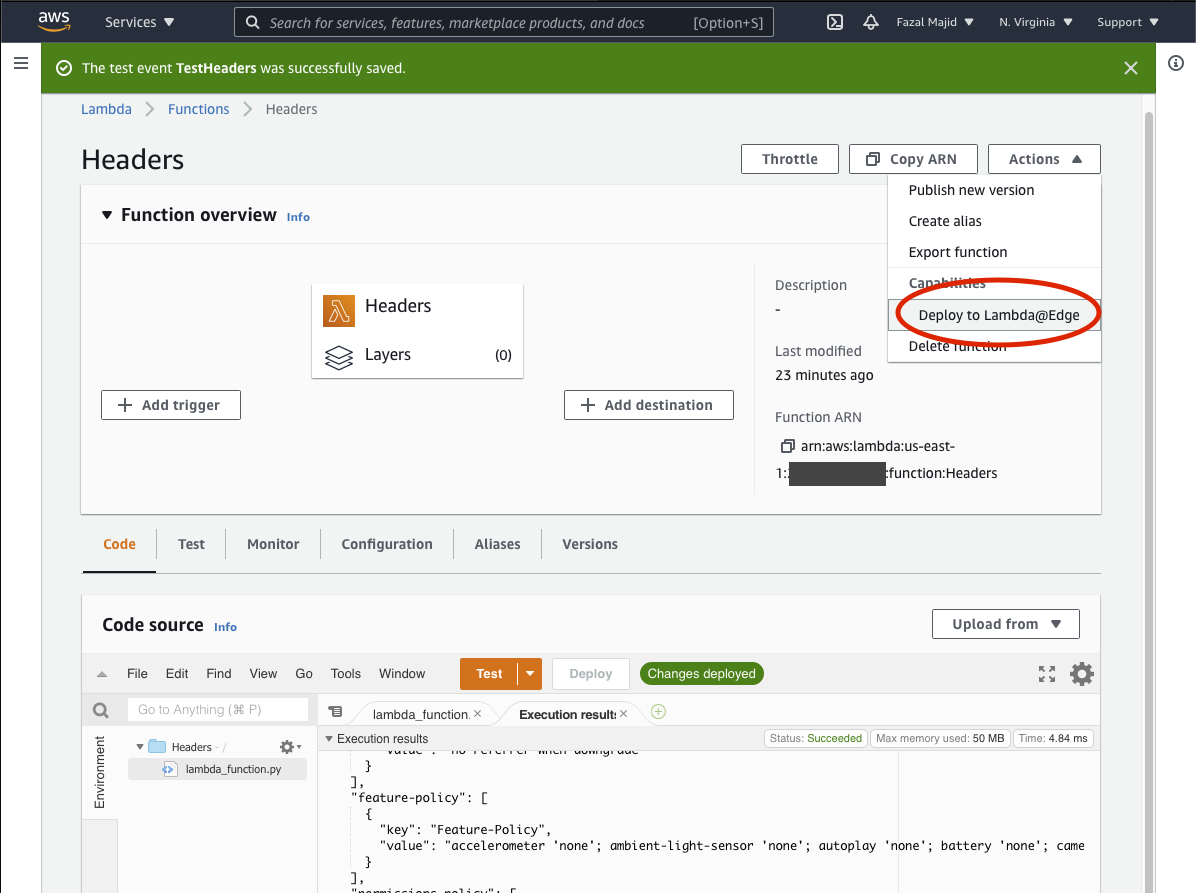
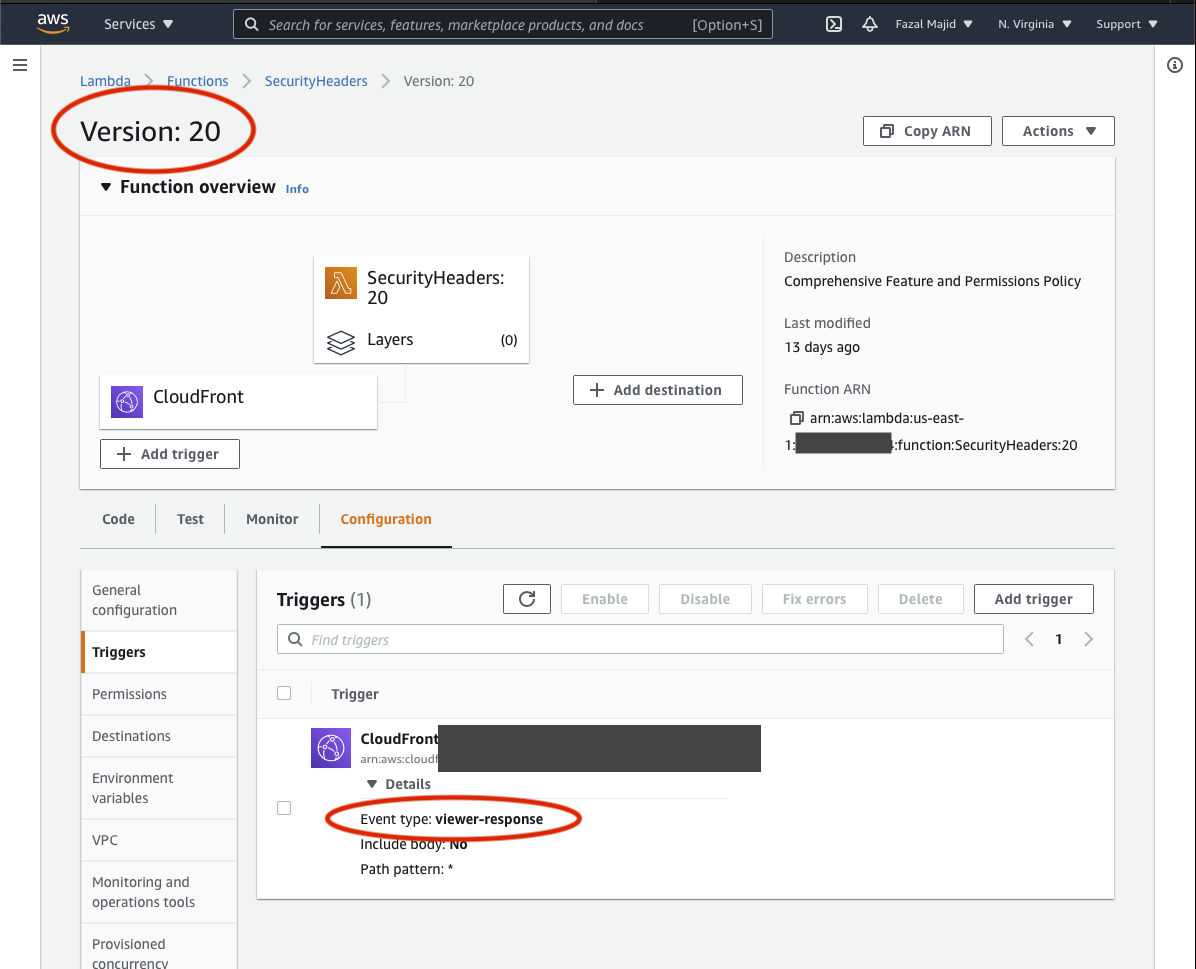
Now, this is very important. There are 4 different places a Lambda@Edge function can hook into.
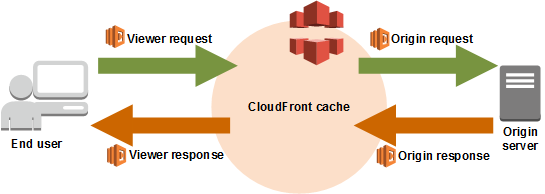
If you deploy your function in the wrong place, most likely you will cause HTTP 500 errors until you can delete the bad trigger and redeploy, a process that takes an interminable 5–10 minutes to percolate through the CloudFront network (ask me how I know...). The hook (event trigger in Lambda@Edge parlance) is Viewer Response, unfortunately the deployment dialog defaults to Origin Request.
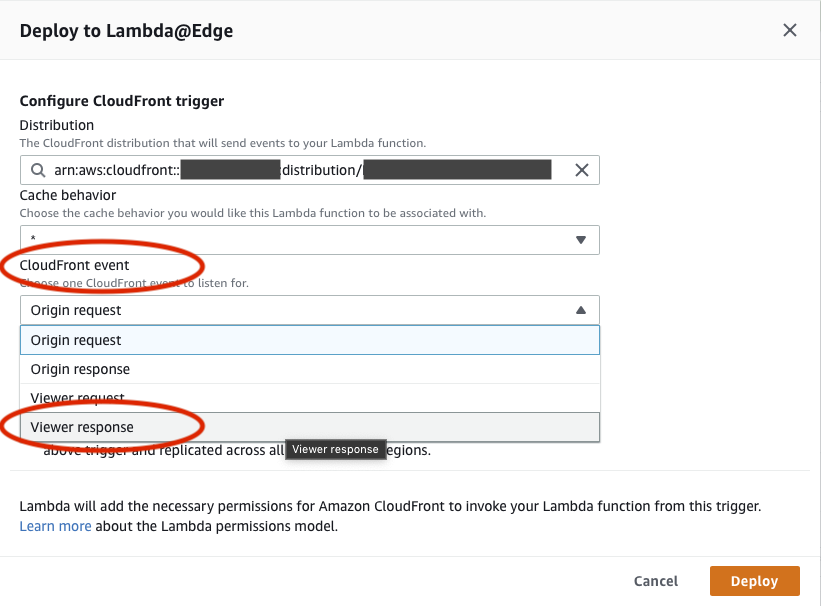
Click the disclaimer checkbox and press the Deploy button. It will take a
few minutes to deploy to CloudFront, and then you can use curl or your
browser’s developer console to verify the headers are sent. I include a header
X-FM-Version to verify which version of the function was deployed.
fafnir ~>curl -sSL -D - -o /dev/null 'https://blog.majid.info/hsts-preload/'
HTTP/2 200
content-type: text/html; charset=utf-8
content-length: 26260
x-amz-id-2: 3ndAsEvUgHDhUYxok9kDnaNCUeQ8QMCbVURoiyjQHc699mrHQvJpN7xwgUeAp7Ir/9Pd1sLwtOU=
x-amz-request-id: 0NDCZD7JEG55903A
date: Wed, 28 Apr 2021 17:55:17 GMT
x-amz-meta-mtime: 1618529322.342819304
last-modified: Thu, 15 Apr 2021 23:28:59 GMT
etag: "33eb01a86db2b3f800c7bee0b5c10c11"
server: AmazonS3
vary: Accept-Encoding
strict-transport-security: max-age=31536000; includeSubDomains; preload
content-security-policy: default-src 'self' https://*.majid.info/ https://*.majid.org/; object-src 'none'; frame-ancestors 'none'; form-action 'self' https://*.majid.info/; base-uri 'self'
x-frame-options: SAMEORIGIN
x-xss-protection: 1; mode=block
x-content-type-options: nosniff
referrer-policy: no-referrer-when-downgrade
feature-policy: accelerometer 'none'; ambient-light-sensor 'none'; autoplay 'none'; battery 'none'; camera 'none'; display-capture 'none'; document-domain 'none'; encrypted-media 'none'; execution-while-not-rendered 'none'; execution-while-out-of-viewport 'none'; fullscreen 'none'; geolocation 'none'; gyroscope 'none'; layout-animations 'none'; legacy-image-formats 'none'; magnetometer 'none'; microphone 'none'; midi 'none'; navigation-override 'none'; oversized-images 'none'; payment 'none'; picture-in-picture 'none'; publickey-credentials-get 'none'; sync-xhr 'none'; usb 'none'; vr 'none'; wake-lock 'none'; screen-wake-lock 'none'; web-share 'none'; xr-spatial-tracking 'none'; notifications 'none'; push 'none'; speaker 'none'; vibrate 'none'; payment 'none'
permissions-policy: accelerometer=(), ambient-light-sensor=(), autoplay=(), battery=(), camera=(), cross-origin-isolated=(), display-capture=(), document-domain=(), encrypted-media=(), execution-while-not-rendered=(), execution-while-out-of-viewport=(), fullscreen=(), geolocation=(), gyroscope=(), magnetometer=(), microphone=(), midi=(), navigation-override=(), payment=(), picture-in-picture=(), publickey-credentials-get=(), screen-wake-lock=(), sync-xhr=(), usb=(), web-share=(), xr-spatial-tracking=(), clipboard-read=(), clipboard-write=(), gamepad=(), speaker-selection=(), conversion-measurement=(), focus-without-user-activation=(), hid=(), idle-detection=(), serial=(), sync-script=(), trust-token-redemption=(), vertical-scroll=(), notifications=(), push=(), speaker=(), vibrate=(), interest-cohort=()
x-fm-version: 22
expires: Thu, 31 Dec 2037 23:55:55 GMT
cache-control: max-age=315360000, immutable
x-cache: Hit from cloudfront
via: 1.1 f655cacd0d6f7c5dc935ea687af6f3c0.cloudfront.net (CloudFront)
x-amz-cf-pop: AMS54-C1
x-amz-cf-id: QkB3rN2hWiI8ah_EJ3x3bvjgbm_BrqhFG1GJ_f4po-Mc2rs_TjTF-g==
Needless to say, because of the convoluted nature of this process, and the
high likelihood of making mistakes, you should test this on a non-production
site before you try this on a live site.
If by error you associated the lambda function with the wrong event trigger, you can delete it by going through the different deployed versions of your function, finding the trigger and deleting it.
